







Waking up with a sore lower back, a nagging hip, or a knee that never quite settles can have many causes. One that people often overlook is a small difference in the length of the two legs. The good news is that a simple, inexpensive tool, the heel lift, can help many people walk and stand more evenly. The catch is that a heel lift only helps when it is used properly. Too thick, too sudden or in the wrong place, and it can create new problems.
This guide explains how to use heel lifts for leg length discrepancy correctly. You will learn what a leg length discrepancy is, how it is measured, how to choose the right type and height, how to place the lift, how to adjust gradually, and when to see a professional.
What Is a Leg Length Discrepancy?
A leg length discrepancy (LLD), sometimes called a limb length inequality, means one leg is shorter than the other. Almost everyone has a tiny difference, and many people never notice it. A difference becomes a concern when it is large enough to change the way you stand, walk or run.
Structural versus functional discrepancy
- Structural (true) discrepancy: The bones of one leg, the thigh bone or shin bone, are actually shorter. Causes include a past fracture, growth differences in childhood, joint replacement surgery or a congenital difference.
- Functional (apparent) discrepancy: The bones are the same length, but the legs act as if they are not. A tilted pelvis, spinal curve, tight muscles or a flat foot on one side can all create this effect.
This difference matters because a heel lift is designed mainly for structural discrepancy. Using one for a functional problem without understanding the cause may not help, and it can sometimes make the underlying issue worse.

Common Signs You May Have a Leg Length Difference
- Lower back pain that is worse after standing or walking
- Hip or knee pain, often more on one side
- One shoulder or hip that looks higher
- Trousers that hang unevenly, or a hem that always looks crooked
- Wear on one shoe that is clearly different from the other
- A limp or a feeling of walking on a slope
- Foot pain, shin pain, or stress-related aches in the longer leg
These symptoms are common and have many other possible causes, so they are not proof of a leg length difference. They are a good reason to get checked.
How Leg Length Discrepancy Is Measured
Choosing the right heel lift starts with knowing the size of the difference. There are several methods, and they vary in accuracy.
- Tape measure method: A clinician measures from a bony point at the front of the pelvis to the bone on the inside of the ankle. It is quick but can be affected by small errors.
- Block test: You stand on thin blocks of known height under the shorter leg until the pelvis looks level. This gives a practical estimate of how much lift you may need.
- Standing X-ray (scanogram): Considered the most accurate way to measure true bone length. It is often used when the difference is larger or surgery is being considered.
Measuring at home with a tape and a mirror is unreliable. Use it only as a rough guide and rely on a professional measurement for the final decision.
Who Can Benefit From a Heel Lift?
Heel lifts are most often recommended for people with a mild to moderate structural discrepancy and symptoms that seem linked to it. Many clinicians do not treat very small differences, often under about 5 to 10 millimetres, unless there are symptoms. Larger differences usually need a more carefully planned approach.
People who may benefit include:
- Adults with a mild structural difference and lower back, hip or knee discomfort
- People recovering from a leg fracture that healed slightly shorter
- People after hip or knee replacement with a small residual difference
- Runners or walkers whose pain appears to be linked to uneven leg length
Types of Heel Lifts and How They Compare
Heel lifts come in several materials and designs. The best choice depends on your shoe type, activity level and how much height you need.
| Type | Best for | Pros | Cons |
|---|---|---|---|
| Foam | Light everyday use | Soft, cheap, comfortable | Compresses over time |
| Gel | Shock absorption | Cushioned, easy to wash | Can feel soft or unstable |
| Cork | Firm, stable height | Does not compress, durable | Firmer feel |
| Rubber | Sports and work shoes | Grippy, long lasting | Can be heavier |
| Layered or adjustable | Gradual increases | Add or remove layers easily | Layers can shift if poorly made |
| Full-length insole lift | Support along the whole foot | Stable, replaces the insole | Needs more shoe volume |
How to Choose the Right Heel Lift Height
This is the step where most mistakes happen. A heel lift that is too tall can cause the ankle and knee to work in an unnatural position and may shift problems elsewhere.
- Do not aim to correct everything at once. Many clinicians begin by correcting only part of the measured difference, often around half to two thirds, then reassess.
- Stay within what a shoe can hold. A lift inside a normal shoe usually works up to roughly 10 to 15 millimetres. Larger differences are typically handled by adding height to the outside of the sole.
- Follow professional guidance. The correct height depends on your symptoms, age, activity and the cause of the discrepancy, so there is no single number that fits everyone.
How to Use a Heel Lift Correctly: Step by Step
Step 1: Confirm the cause and the size
See a doctor, physiotherapist or podiatrist and ask whether the discrepancy is structural or functional, and how large it is.
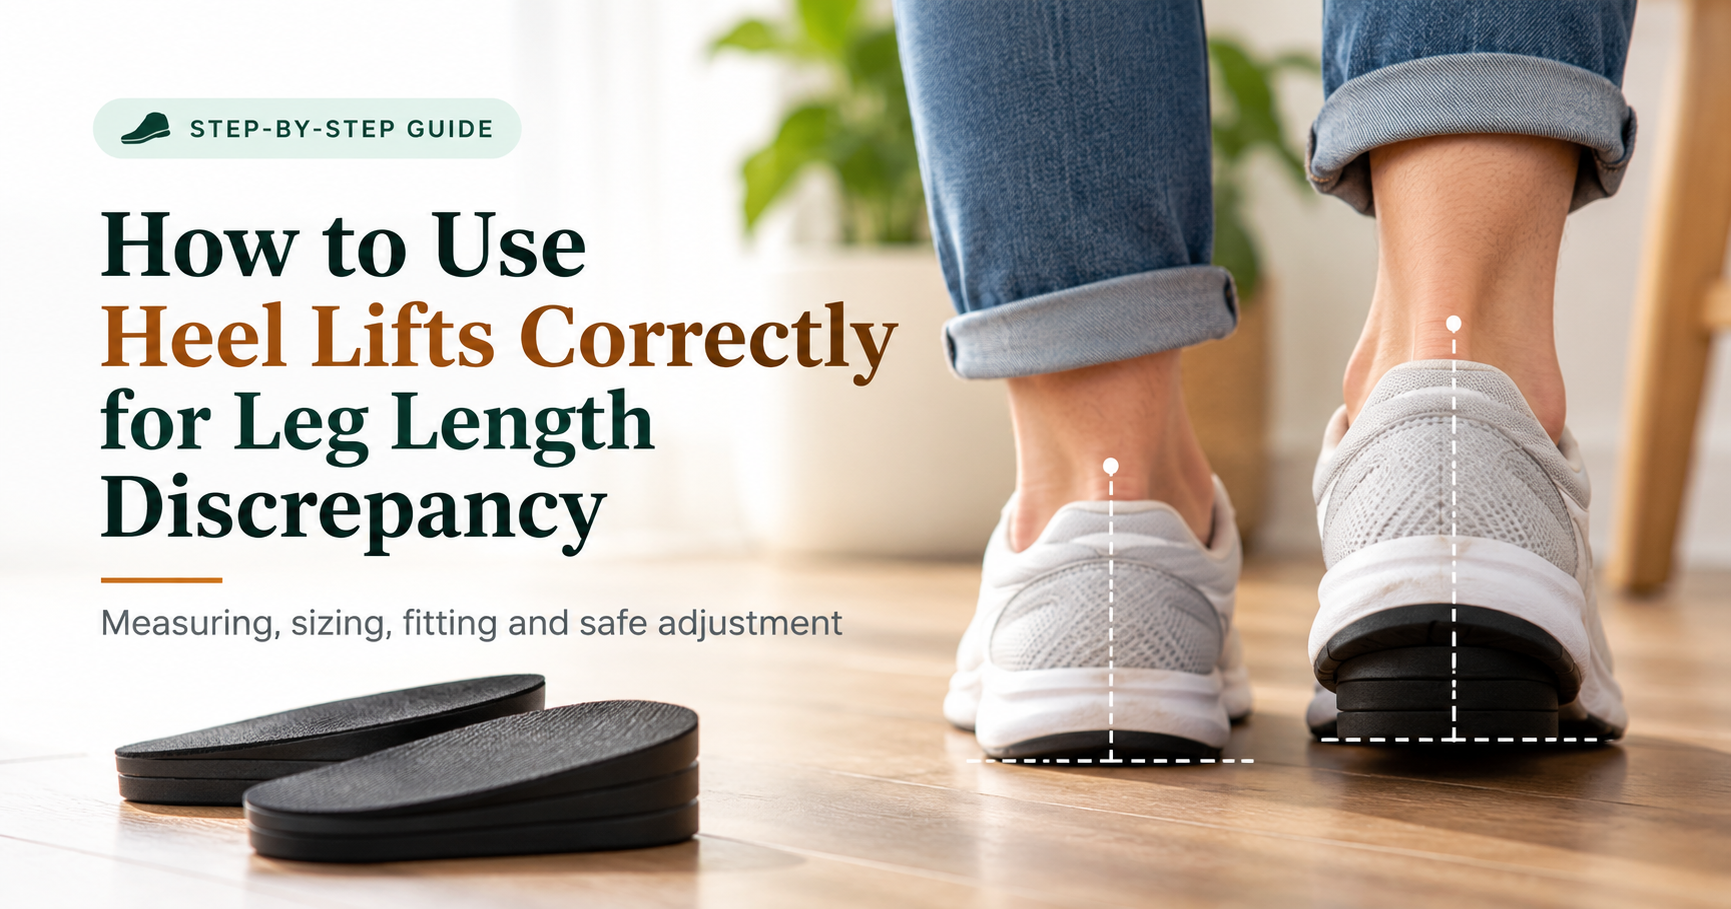
Step 2: Put the lift in the shoe of the shorter leg only
Place it in the shoe on the shorter side. Putting it in the wrong shoe will double the imbalance, so double check the side before you start.
Step 3: Position it in the heel cup
The wide, thick end sits at the back, under the heel, and the thin end tapers toward the middle of the foot. The lift should lie flat against the shoe with no wrinkles or gaps. Remove the original insole first if the shoe feels too tight, then put it back on top if there is room.

Step 4: Check the fit of the shoe
Your heel should not slip and your toes should have room to move. If the foot rides up and rubs at the back of the shoe, a lace-up shoe with a firm heel counter works better than a loose slip-on.
Step 5: Start with short wear periods
Your body has adapted to the old pattern for years, so give it time. Begin with one to two hours a day, then add an hour or two every day or two as long as you feel comfortable.
Step 6: Increase height gradually
If your clinician plans to build up the lift, a common approach is to add about 2 to 3 millimetres every one to two weeks. Slow progress lets muscles, joints and the spine adapt without strain.

Step 7: Use it in all your regular shoes
If you wear the lift only in one pair, your body will keep switching between two patterns. Use matching lifts in your most-used shoes or consider a shoe modification for a long-term solution.
Step 8: Review regularly
Check in with your professional after a few weeks and again every few months, especially for children and teens, because the difference can change.
What to Expect During the Adjustment Period
It is normal to feel a little different at first. You may notice mild muscle tightness in the calf, hip or lower back for a few days. This should settle as you adapt. Aching that grows worse, sharp pain, numbness, tingling or new pain in the knee or ankle is not normal. Take the lift out and speak with your clinician.
Common Mistakes to Avoid
- Using too much height too soon: It is the number one cause of new aches.
- Putting the lift in the wrong shoe: Always check the shorter side.
- Guessing the measurement: A guess can be wrong by several millimetres, which matters at this scale.
- Using a lift that slides: A loose lift creates an unstable heel. Choose one that fits snugly.
- Wearing only in some shoes: This keeps your body changing between two patterns.
- Ignoring pain: Pain that does not settle means something needs to change.
- Skipping follow up: Needs change over time, particularly in growing children.
Heel Lifts Versus Other Options
- Full insole lifts or orthotics: Better when you also need arch support or have a foot posture problem.
- Shoe sole build up: A cobbler or orthotist adds height outside the shoe. This suits larger differences and keeps shoes roomy inside.
- Exercise and physiotherapy: Stretching tight muscles and strengthening the core and hips may help, especially for functional discrepancy.
- Surgery: Reserved for large discrepancies or specific conditions, and always decided by a specialist.
Buying Guide: What to Look for in a Heel Lift
If you are shopping for a heel lift, these features separate a good product from a poor one:
- Clear height markings: Look for products listed in millimetres or inches so you can follow your professional’s advice.
- Firm yet comfortable material: Very soft foam can compress, which changes the height over time.
- Good size range: Options for men, women and different shoe sizes help the lift fit properly.
- Adjustable layers: Useful if you are building up height gradually.
- Non-slip base: The lift should stay in place with every step.
- Skin-friendly, breathable material: Important for all-day wear.
- Easy cleaning: Sweat and odour build up inside shoes.
- Return policy: Fit is personal, so being able to exchange is valuable.
When to See a Professional
Seek advice from a healthcare professional if:
- You have never had your leg length measured
- The difference seems larger than about 1 to 1.5 centimetres
- Pain is severe, getting worse or waking you at night
- You have numbness, tingling or swelling
- The discrepancy appeared suddenly or after an injury
- A child’s legs look uneven
Frequently Asked Questions
Can I wear a heel lift every day?
Yes, once your body has adapted and your clinician agrees. Build up wear time slowly at first.
How long does it take to get used to a heel lift?
Most people feel comfortable within a couple of weeks, though it can take longer if the height is increased in stages.
Should I wear a lift in both shoes?
No. Place the lift in the shoe of the shorter leg only, unless a professional gives different advice.
Can heel lifts cause problems?
They can if the height is wrong, increased too fast or used for the wrong cause. This is why measurement and gradual adjustment matter.
Do heel lifts fix a leg length discrepancy permanently?
No. A heel lift compensates for the difference while you wear it. It does not change the bone length.
Can I use heel lifts for Achilles tendon pain?
Some people use lifts to reduce strain on the Achilles tendon, but that is a different purpose with its own guidance. Ask your clinician before using one for that reason.
What shoes work best with heel lifts?
Lace-up shoes with a firm heel counter and removable insoles are ideal. Shoes with deep heel cups hold a lift securely.
Final Thoughts
Learning how to use heel lifts for leg length discrepancy correctly comes down to five principles: get a proper measurement, place the lift in the shorter leg’s shoe, position it flat in the heel cup, increase height slowly, and review your progress regularly. Done well, a small piece of foam, cork or rubber can make standing, walking and exercising feel noticeably more comfortable.
If you are unsure, speak with a professional first. A short assessment can save weeks of trial and error and help you choose the right lift from the start.
Affiliate disclosure: Some product recommendations on this site may earn a commission at no extra cost to you.